You are Here in Home » how tos'
Hello Freinds Today I am Going to Show You an amazing intresting trick now you can Add all facebook friends to group at once, Accept All Freind Request At Once In Single Click With Your Mobile Phone, this is an exclusive tricks provide by our HCE™.
We have tested this trick it's 100% working so now you no need to use pc for accepting all friends at once + adding all friends to group as members + Unfreind All Freindss In Single Click.
So hurry and lets follow below steps to use our Facebook Multiple Trick with pufin browser
Here Are The Steps:
1) Firstly Download & Install Puffin Web Browser From Google play store
2) After Download, Open the app Go To Setting And Turn On The Desktop Mode.
3) Now Click On Add Bookmars
4) Now Name The Bookmark “Multi Tools”

5) Edit Location And Copy and Paste these codes [Download ]
6) Now open fb.com and open Friend request page or Group where u wants to add member or friend list.
7) Now Open This Bookmark.
8) When You Open This Bookmark on Facebook.com You Will See like screenshot below-

Thats it. Lets enjoy this amazing trick.
Comnent with the trick you want to learn
Welcome guys in this Trick We Learn That how we can Hack Facebook Group Easily. We can Hack Any Group Without Any Software . Now If you Follow These Steps I Hope you Will Easily Hack Your Groups.
Many Groups which have very low Member which we can easily hack. If you Hack Big Group So you will need to Try A Report Admin Trick And Hack a Big Member Group . This Trick Is Very Easy which Hack Easily Small Ranking Members On facebook.

Image Credit: Hacklonepal
If You Hack Group On Facebook You Need To Follow These Steps And Hack Group On Facebook Easily.
Method: Public admin less group
1. Login To Your Account Using Either PC Or Facebook App.
2. Now Goto Any Adminless Group. Goto Members >>Admin. When You Goto Admin Section, There Would Be Two Options (a) Make Me Admin or, (b) Suggest Admin. Choose Make Me Admin. In This Way You Can Claim Any Adminless Group.
NOW TO HACK FRIEND'S GROUP THAT BETRAYED YOU.
1. Destroy/Crash Admin's Id. In This Way His Id Would No longer Be An Admin.
2. Now Claim That Adminless Group.
Method: Hack any Groups
Requirements:
1. PC
2. Chrome Browser
3. Social toolkit premium version from Here
1) First Of All You Need To Open Google Chrome Browser.
2) After Open Now Click On This Link And Install social toolkit from.
Download Now || Mirror Link
3) Click On ” Add To Chrome “.
4) After Add In Chrome.
5) Now Open your ” Facebook Account “.
6) After Open Click On “ PST ” Extension.
7) Then Click On ” Claim As Group Admin ” .
 Image Credit: Ballowap
8) Now Wait Few Second You can See That You Hack Facebook Groups Easily.
I Hope Now You Get Best Feeling After See This Trick And Hack Any Groups On Facebook.
There Are Many Groups on Facebook . Butt
Some Groups are very Big which you can not hack easily. If you Like Small groups so which groups you can hack easily without any problems.
In this Hidden Trick We have Learn Very Best Trick From 24wikis I Hope You Like This Trick because This trick never share on Internet But 24wikis give best Trick of Users.
We Can Hack Groups Easily On Facebook.
If you Like This Trick Now you Need To Share This Site And This Trick Links To Your Friends And Hack Facebook Groups With Enjoy.
Thanks:
Bello Azeez Taiwo
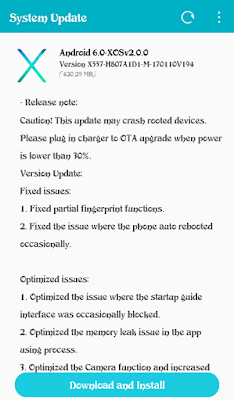
To those of you that has been dishing out complains about the glitches you are experiencing on your infinix hot 4, there is an update available for you. The update fixes issues with partial finger print functions and phone auto rebooting itself occasionally.
Optimized issues
1. Optimized the issue where the startup guide interface was occasionally blocked.
2 optimized the memory leak issue in the app using process
3. Optimize the camera function and increase
Caution:
Before you download and install the update, make sure you are not rooted to avoid stories that touch.
USB Flash Drive you received an error message - The Disk cannot be written because it is write protected. Please remove the write protection from the volume in drive \Device|Harddisk1\DR5.
Occasionally, USB drives can become write-protected due to a manufacturer setting or because of a fault in the disk.
However, I’m going to show you how to remove this setting, giving you the capability to modify, copy, or delete any files from your USB drive.
How to Remove Write Protection From USB Drive
This method will fix it once and for all for you
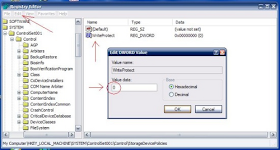
>> Press Win+R (This will open the registry editor)
>>Type in regedit and hit the OK button
>>Expand and collapse the entries on the left to navigate to the following location:
HKEY_LOCAL_MACHINE\SYSTEM\CurrentControlSet\Control\StorageDevicePoliciesIf you don't have aStorageDevicePolicies folder in the Control folder, right-click in the folder and select "New" → "Key." Name itStorageDevicePolicies and then open it.
>>Double-click the WriteProtect key located in the right side pane and set the value to 0. Go to the Data Valuebox and press OK:
Reboot your computer and reconnect your USB drive to the system, the drive should now be writable.
However, if you’ve carefully followed the above instructions and you are still unable to restore your drive back to normal, then your last option will be to format it which might be a pain in the ass.
This is one of the major reason why Android OS is always upgraded it’s expose to various dangers of being hacked, viruses and damages. A lot of us have fallen prey of deadly viruses that auto-root your Android device without your permission.
Some viruses has even formed boss on your device, install apps by itself, turn on your wifi and data all by itself and atimes hinder you from making calls. This is so annoying and embarrassing but you can get rid of such viruses.
Today, let me show you how to get rid of Netalpha virus.
Netalpha Virus is a new type of malware that infect android mobile phone and tablet. It installs apps on your phone without your permission, steal vital information on your device and send it to its creator. It renders your device useless.
How do I Get Rid of Netalpha Virus?
1. Boot the device into safe mode (Press and hold the Power button until the respective screen pops up)
2. Click and hold the option that says Power off. Depending on the vendor and the phone model, the methods can vary.
3. Confirm rebooting into safe mode by tapping OK
4. When in safe mode, go to Settingsand select Apps
5. Scroll down the list of programs and locate Netalpha, Key Chain, Fast Search, and Xiny. The troublemaker can also be an object named BaDoink,Engriks, Time Service, MonkeyTest,Quick Swipe, Measure, mobileOcr,UpService, org.on.phone.update or some other suspicious app that was recently installed
6. Tap each offending app in turn and select the Uninstall option. If this button is not active, try Force stop first
7. Tap OK on the confirmation dialog to uninstall the virus
8. Restart your device in normal mode. The Netalpha virus by now should be completely off your device and finally, make sure you install a standard antivirus to prevent future attack.
Is your smartphone not restarting or rebooting during software update? is it displaying No Command error with a resting Android robot? Yea! This problem only happens when super user access has been denied or cancelled during software installation process particularly App store (Google installer Widget and Software update.
It is a bad experience when you are trying to upgrade your phone to the latest version and when it is now installing, it just went off and shows NO COMMAND error. As shown below;
So the best solution for you, is to manually boot into your recovery mode and finish your installation. Let's see how to do it.
How To Fix No Command Error On Android Device
Make sure your phone is charged at least 80% and unplug all cables connected to your smartphone before you proceed.
Is very simple and easy. Just press your power + volume up buttons from the No Command Error screen to boot into recovery mode.
Then use the volume down button to navigate to Apply Update From SDcard and Tap on it by using volume up button.
Then another page will open. Then use the volume down to move down to Updater and select it by using the volume up button.
Then use volume down button to highlight "fp_update_OTA[version number].zip" and select with volume up button.After that, installation will take place and after installation, you will see a message that says "Install from SDcard complete.".
Then reboot your phone or go back and press REBOOT NOW from the recovery mode.
Wow! Your phone is back again.
- Rooting has so many advantages but these days, I noticed that many Android users care less about Android rooting probably because most of the Android features you had to root your device to get now ship by default.
RAM means random access memory and it's different from your inbuilt memory storage because RAM works, when you are doing something or running apps, widgets and many others with your phone. Meanwhile, there are two ways to increase RAM; rooting or not-rooting methods and they are going to be treated in this article.
How To Increase RAM Without Rooting Access
Disable Applications - There are some applications that run on background even when you didn't launch or run them and they make phone hang, so you just have to take time and disable such applications in order to improve your phone performance by going to Settings>>Apps>>All and the lists of all apps will be displayed then tap on them and disable the apps (do not disable follow-come or pre-installed Apps).
Limit Wallpapers And Widgets - These Widget and live wallpapers do reduce the performance of smartphone and of course, it kills battery faster. So try and remove or limit them in order for your smartphone to be more faster when in use.
Disable Animations - This steals RAM and kills battery as well. Try and disable it in order to increase the speed and performance of your smartphone and to enjoy your phone to the fullest. Just go to Settings>>Developer options (if you don't have a developer option, just tap on ABOUT PHONE six times and it will come out) then enter the developer options and scroll down to disable or turn off animations. As shown below;
How To Increase RAM With ROOT Access
This way needs ROOT and is just by creating a separate space on your SD card which will act as your secondary source of RAM. To do this, you need an application called ROEHSOFT RAM Expander (SWAP) that can be downloaded by clicking here (you can download it free by using blacksmart App). So you will need a class 4 SD card or higher ones.
How To Check If Your Phone Is Compatible For Increasing RAM
- Before you start, you will have to check if your phone is compatible to increase RAM by downloading MemoryInfo & Swapfile Check on playstore by clicking here.
- Then run the app and give it ROOT access permission.
- Then select your SD Card.
- Then tap on CLICK FOR RESULT.
- When your phone is compatible, it will display " Congratulations' appears, your device is compatible with the RAM expander app!".
How To Finally Increase The RAM
- If your phone is compatible, just run or launch the ROEHSOFT RAM Expander (SWAP) app.
- Then give it ROOT permission and select English as your language.
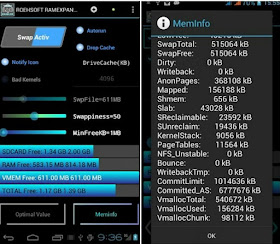
- Then use the slider to select the amount of space you want to add to your phone or better still, use the Optimal value to automatically adjust the settings for the best performance, and make sure you enable autorun. As shown below;
- Then after that, you can now finally tap on Swap activ to complete the process.
So by now, your smartphone should have more RAM and your phone will be more faster and performance increased through the support of your SD card.
Why convert to a Facebook Page?
What happens when you migrate from Profile to a Page?
- Your username will become the username of your page and from now on all links should point towards your newly created page.
- All friends and followers of your profile will converted to your page fans and will be shown in the form of likes.
- Your name will become Page’s name.
- Your profile picture will become Page’s profile picture, and similarly, cover photo will become Page’s cover photo.
- You will get 14 days window to move all your personal data to the migrated page. However, your profile data won’t get affected in case you choose not to move it.
Checklist before moving ahead with migration
2. Choose identical names for both your profile and page (to match your business needs).
3. If you administer any groups on Facebook then choose new group and page admins.
4. Head to this profile migration tool and click on Get Started to begin the process which takes a few minutes depending on the amount of data on your profile.
Can this migration be reversed?
Should you really migrate from Profile to a Page?
The decision to migrate depends utterly on your needs. If you have a profile that you primarily use to update with non-personal activities then you must consider moving to a page. Though Facebook no longer affects your Profile data, but if you still want to avoid the migration process then create a new page instead and tell your followers about it. And the next time you post any update on your timeline, double check if you’re following Facebook Terms properly.
Normally, Tecno Y4 doesn't have the feature to receive latest Android version and the best way to upgrade, is by installing a custom ROM. This custom ROM was designed by Raj Shekhar.
Features Of Tecno Y4 Custom ROM (Mystic OS V7)
- Marshmallow boot animation
- Material designed
- CM12.1 themed
- Mystic OS boot logo
- CM12.1 app icon
- Nova launcher prime
- Default launcher
- Android M sounds
- marshmallow platlogo and game
- CM12.1 music player
- Material themed dialer - Contact, MMS and all other apps.
- Floating action botton in messaging, calendar
- Card stack recent panel
- Stock gallery and camera
- Based on WIKO rainbow stock ROM
- So their are very less chance of bugs
- Lollipop Lockscreen
- Lollipop inspired volume panel
- Inbuilt screen recorder
- 4 ways reboot options in power menu
- Cyanogenmod Lockscreen
- PRE-ROOTED with super SU
- busybox installed
- ABS Tweak inbuilt
- Better RAM management
- Better battery backup
- ROM size is 295MB
- And many more.
How To Install Mystic OS V7 Custom ROM Into Your Tecno Y4
Before you proceed, your phone must be rooted even with 50% battery life or above and you must use only Tecno Y4 to install this custom ROM.
- Firstly, you have to download the Mystic OS V7 custom ROM by clicking here and save it in the root of your SD card then download custom recovery by clicking here.
- Then power off your phone and hold Power + Volume up button to boot into recovery mode then locate where you downloaded your Mystic OS V7 and swipe right to install.
- After installation, go to the recovery mode menu and tap on Wipe data/reset then mark SYSTEM, DATA, Dalvik and swipe to wipe cache.
- Then tap on REBOOT NOW. Wow! Your Tecno Y4 will now be running on 6.0 Marshmallow.
How To Fix The Bugs Attached To This Custom ROM;
Keyboard fix - You can download it by clicking here and use the above method to install and fix the bug.


